Group management in Able+
The Group management area enables you to view and manage groups that are synchronised into or created in Able+.
Accessing group management
To access the group management area, click the Admin option in the left-hand menu and then select Groups in the main admin menu along the top of the page.
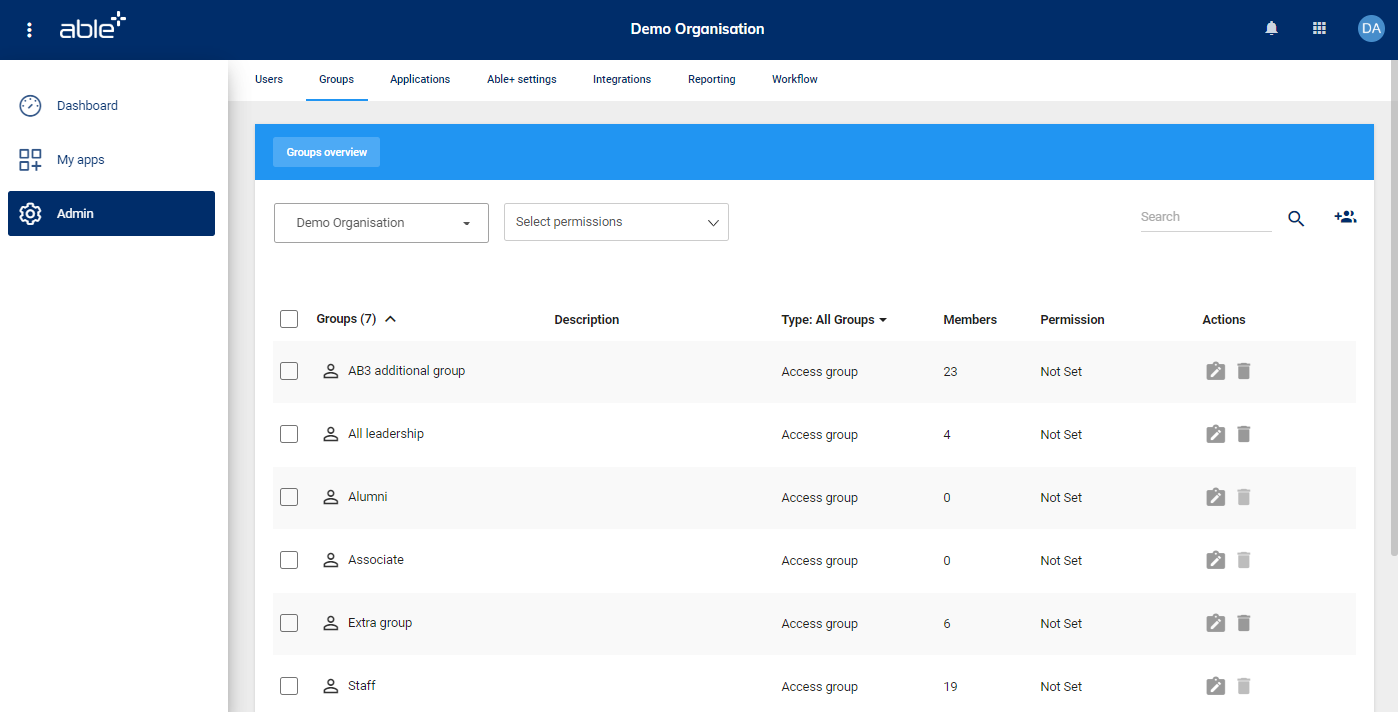
Please note, one or more of the actions in the group management category is required in a user’s permission set for them to access this feature. The Manage groups action is required to make any changes to groups and their membership.
Creating a new group
To create a new group, click the create group option in the top right corner of the groups overview page.
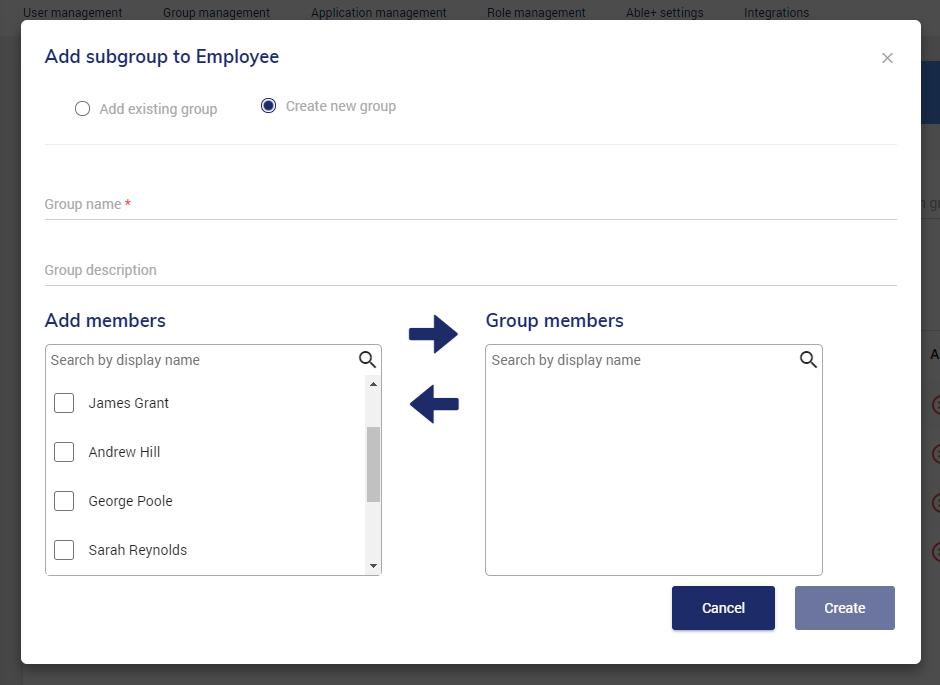
Here you must give the group a name and can add an optional description if required. Members can be added on creation or by editing the group later.
To add members to the group you can search and select users from your whole organisation or select an existing group first and then select the users.
Use the right arrow to move the selected users into the group. (If you add a user accidentally they can be moved back with the left arrow.)
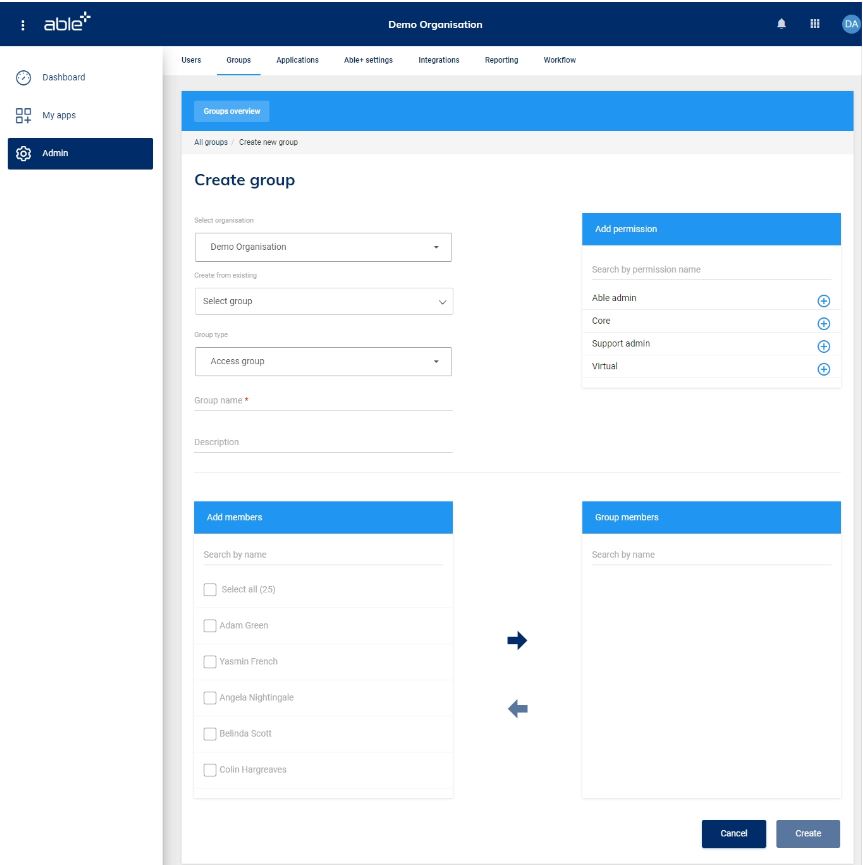
When you have finished, click the Create button. You will be taken back to the groups overview and the newly created group will display.
Where the group you want to create is similar to an existing group then you can use the duplicate group option. This is available from ‘more options’ within the group you wish to duplicate. You can then edit the duplicated group to meet your requirements.
Group information
Basic information on all groups in your organisation is displayed on the groups overview page when you first access group management. You can use the search option to find a specific group.
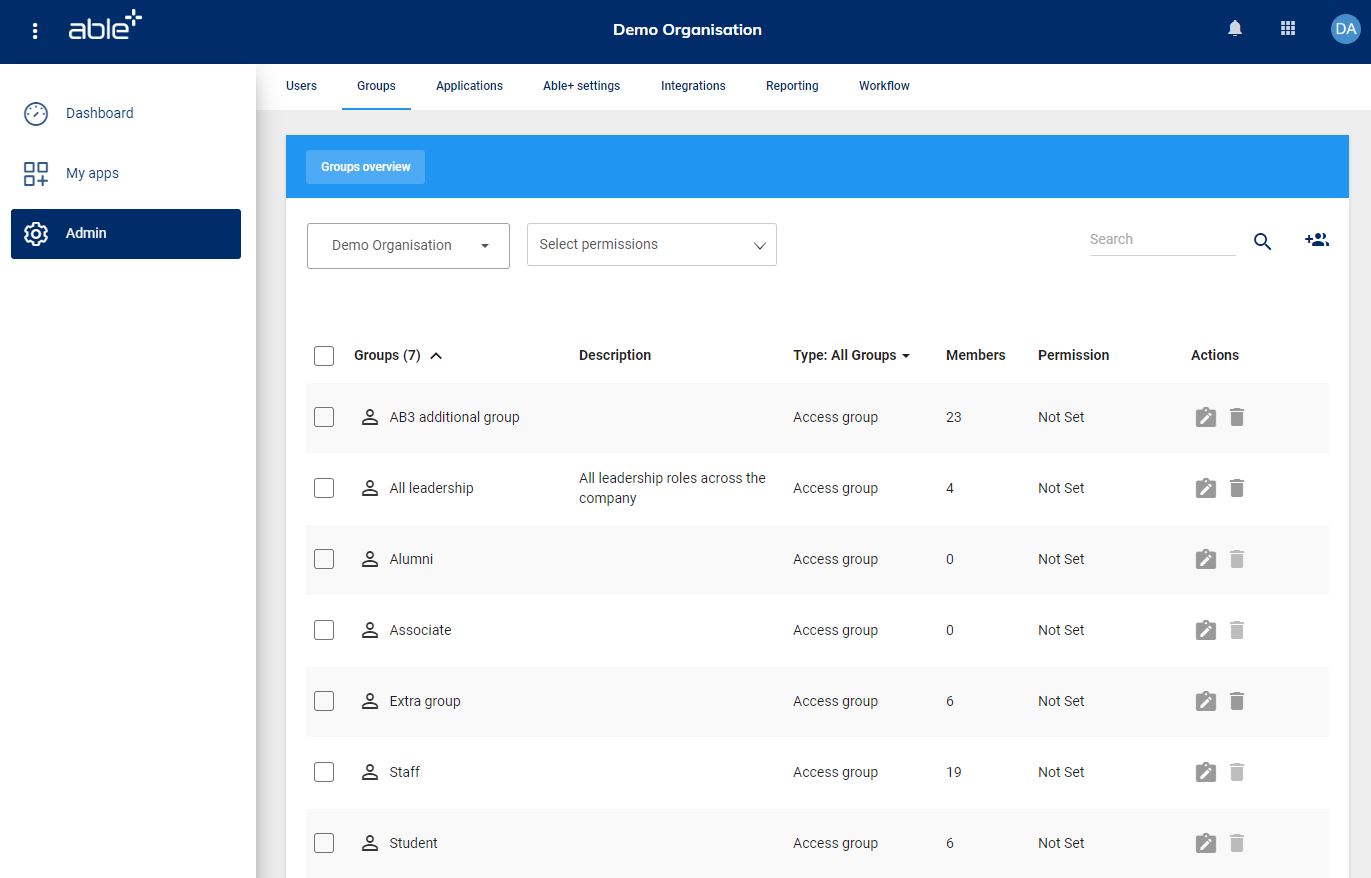
A group that is a parent of another group will be indicated with this icon:
A group that is a child of another group will be indicated with this icon:
A group that is standalone (no parent or child) will be indicated with this icon:
Where a group has a permission set assigned to it, this will display in the permission column.
Viewing group information
From the groups overview page click on the group that you want to see more information about.
Here you will see:
-
the group description (if available)
-
whether the group is a parent of any child groups and, if so, which groups (expand to view)
-
whether the group is a subgroup of any parent groups and, if so, which groups (expand to view)
-
a list of the users who are members of that group.
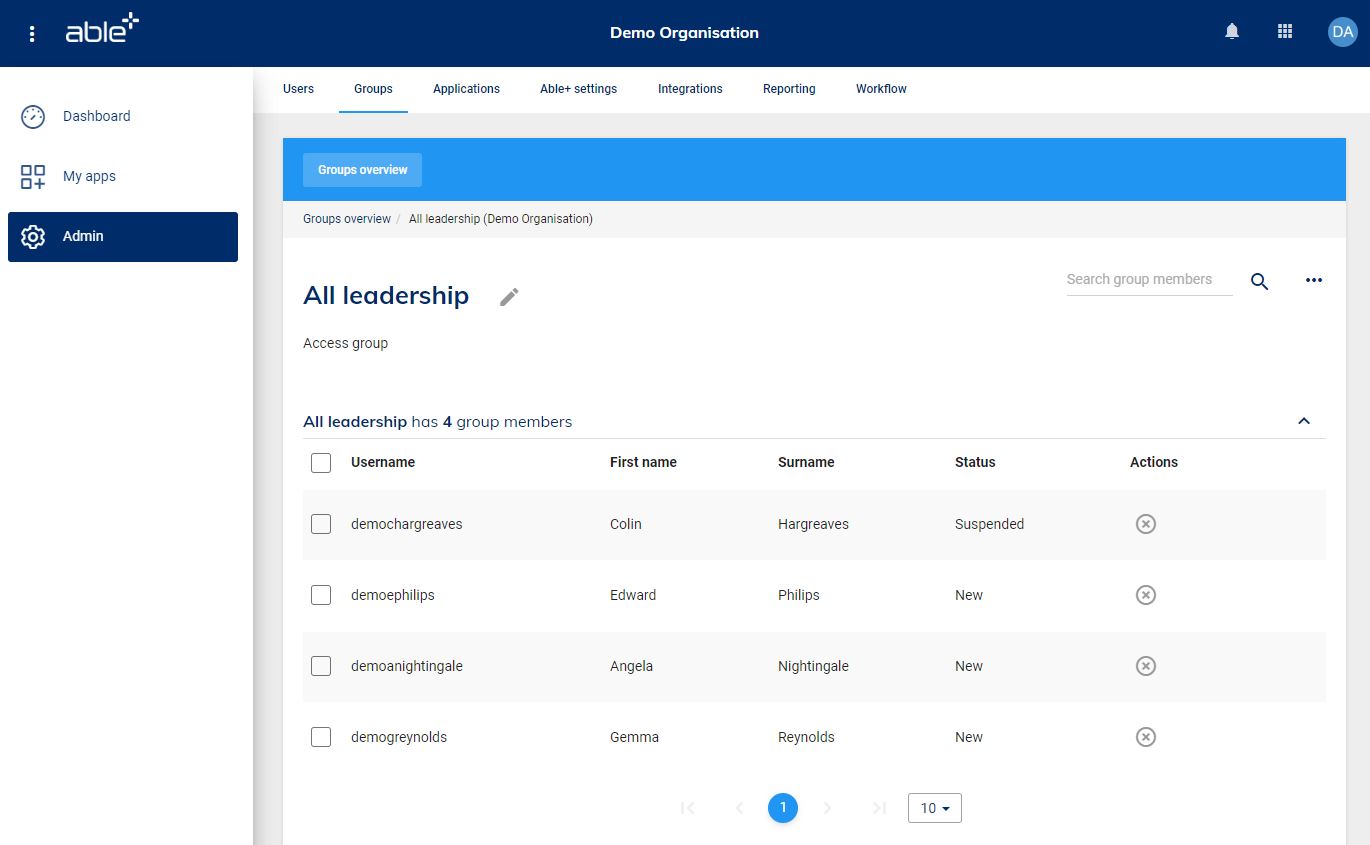
You can use the search option at the top of the screen to search for a member of the group.
Click Groups overview towards the top of the page to return to the list of groups.
Editing group information
When viewing a group, click on the edit icon next to the group name to change the name or add/edit the group description. Click the Save editing button to save your changes.
Editing group membership
It is possible to edit membership of any group that is controlled within Able+ (i.e. where the group is not created via synchronisation with an external input).
It is not possible to edit membership of the groups automatically created for each user type. These are populated with all users of that user type and are updated automatically when users are created or deleted.
Click to view the group where you want to edit membership.
Adding members to a group
To add members to the group, choose Add members from ‘more options’ at the top of the group page. You can search and add users from your whole organisation or select an existing group first and then add users from that group.
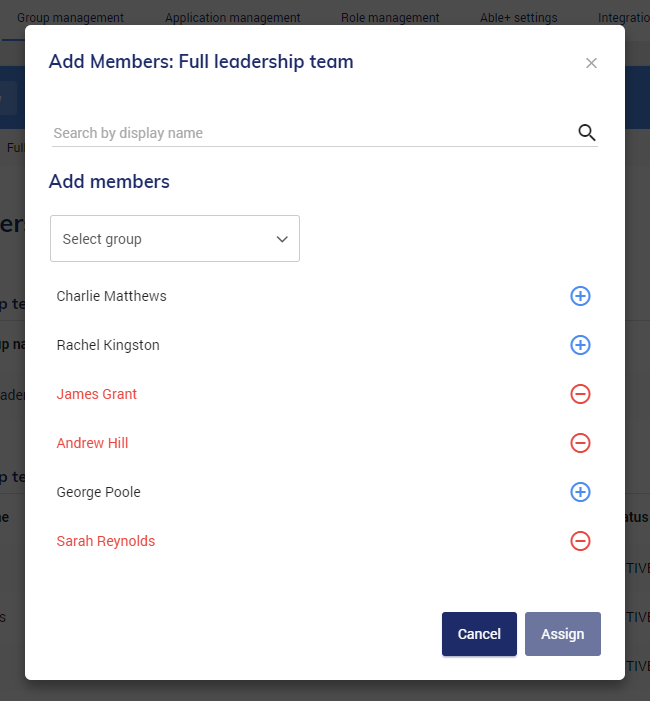
Use the plus option next to a user to add them to the group. When you have finished adding members click the Assign button.
Removing members from a group
One or more members can be removed from a group by selecting them and then using the remove option at the top of the page.
Deleting groups
It is possible to delete any group that is controlled within Able+ (i.e. where the group is not created via synchronisation with an external input) apart from the user type groups.
One or more groups can be deleted from the Groups overview page by selecting them and then using the delete option in the top right corner of the page.
When you are viewing the details of a particular group you can delete that group from ‘more options’ .
Group admins
Adding and removing group admins
A user with the action Manage group admins or Manage group admins in child places will be able to add and remove group admins to any group within their Able+ place.
It will also be possible for additional group admins to be added or removed by an existing admin of that group.
When viewing a group, click the ... menu in the top right-hand corner and choose ‘Add group admins’. You can then search for users by name using the search bar or use the drop-down menu to search for users within your groups. Then click the + next to the user(s) you wish to add as a group admins.
Then click the Next button and select an interaction permission set(s) you wish to assign to the group admin. Please note that this is mandatory. Finally, click the Assign button.
The group admin(s) display name and their interaction permission set(s) will be displayed on the group details page in a separate section from the group members.
Each group admin will have a remove option next to them. Clicking this will give the user a confirmation message which reads:
Are you sure you want to remove [display name of user] as a group admin?
Clicking cancel will close the dialog without making a change. Clicking Ok will remove the user as a group admin.
Editing permission sets for group admins
It will be possible for a user with the manage group admins action in the place or the change admin role interaction on the group to edit a group admin’s permission set. A group admin must always have at least one permission set.
To edit the permission set(s) for a group admin click the pencil icon to the right of their name.
You can then choose to add or remove permission sets for the group admin. Click the Assign button when you are finished.
Please note that it will not be possible for a group admin to edit their own permission set(s).
Group admin users who also have a standard group management action
A group admin who also has a standard role which includes one or more group management actions will only be able to perform any interactions which are included in the interaction permission set for the group they are an admin user for. For all other groups they will only be able to perform actions defined in their standard group management actions.
The groups that the user is an admin of will be indicated by an admin icon after the group name.
Group admin users who do not have a standard group management action
A group admin without any standard group management actions will be able to access Admin > groups and see the group(s) that they are admin of on the groups overview list.
They will not be able to view or search for any groups that they do not have an admin permission for.
They will then be able to perform any group management interactions on those groups that are included in the interaction permission set they have been assigned on the group.
They will not be able to delete the group or change its permission set(s) so these actions will not appear.
Auditing group admins
The following actions will be recorded together with the date and time of action for auditing/reporting purposes:
- Admin added to group (name of group, display name and username of admin, display name and username of user who added admin)
- Admin removed from group (name of group, display name and username of admin, display name and username of user who removed admin)
- Role assigned to admin (name of group, display name and username of admin, display name and username of user who assigned role, name of role assigned)
- Role removed from admin (name of group, display name and username of owner, display name and username of user who removed role, name of role removed)
Changing the permission set for a group
By default, groups do not have a permission set and will show as ‘not set’ in the permission column.
It is possible to change the permission set assigned to a group either individually - by clicking the change permission set option next to the relevant group - or in bulk - by selecting groups and then choosing Edit permissions from ‘more options’
.
Where the group(s) has a permission set assigned it will appear with a tick in the list of permissions and you can click the Remove option if that permission set is no longer required. Additional permission sets can be added by ticking them and then clicking the Save button.
Where multiple groups have been selected and one or more of them already has a permission set then there will be a number to show how many of the selected groups have each permission set.
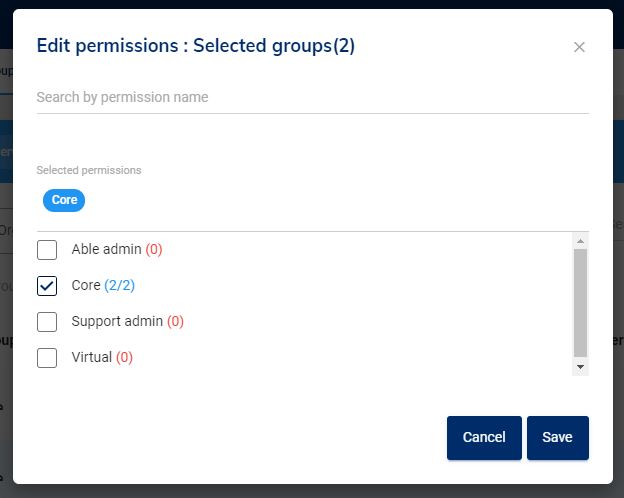
Users will be given the permission set of any group they belong to in addition to the permission set that they have been given as an individual. This will give them permission to perform any actions that have been assigned to any of those permission sets.
Controlling application access via group management
From the group management page you can assign applications to members of groups. These will appear on the My apps page of all members in that group and they will not be able to remove them.
If you just want to make an application available to the users so that they can choose to add it if they wish then this can be done from the application management area.
Sub groups will also have access to the applications that you assign to their parent group.
Managing applications when viewing a group
When you are viewing a group, you can select the Manage applications option from ‘more options’ .
You can then use the plus to add access to an application for the group or the minus
to remove access to an application for the group. Click Save when you have finished making changes.
Managing applications for multiple groups
From the groups overview page, select the groups you wish to manage application access for and then click ‘more options’ . You can then choose to either add apps to the selected groups or remove apps from the selected groups.
Next to each application you will see how many of the selected groups currently have that application assigned to them.
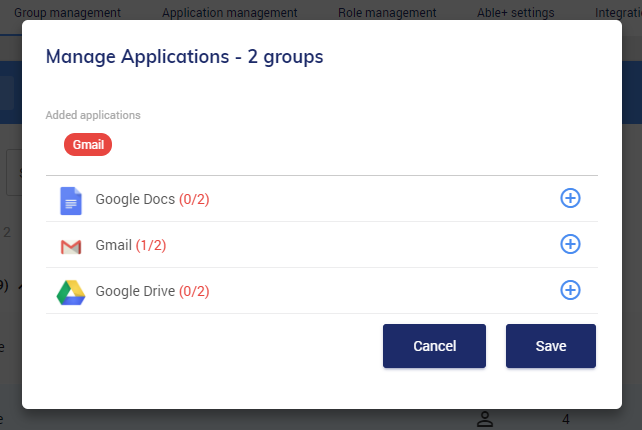
Creating a sub group
When viewing a group you can add a sub group to that group - either by choosing an existing group or by creating a new group.
To add a sub group to the group you are viewing, choose Add subgroup from ‘more options’ .
By default you will see a list of existing groups. Select one or more of these and the use the right arrow to make them sub groups of the group you are viewing. (If you add a group accidentally they can be moved back with the left arrow.)
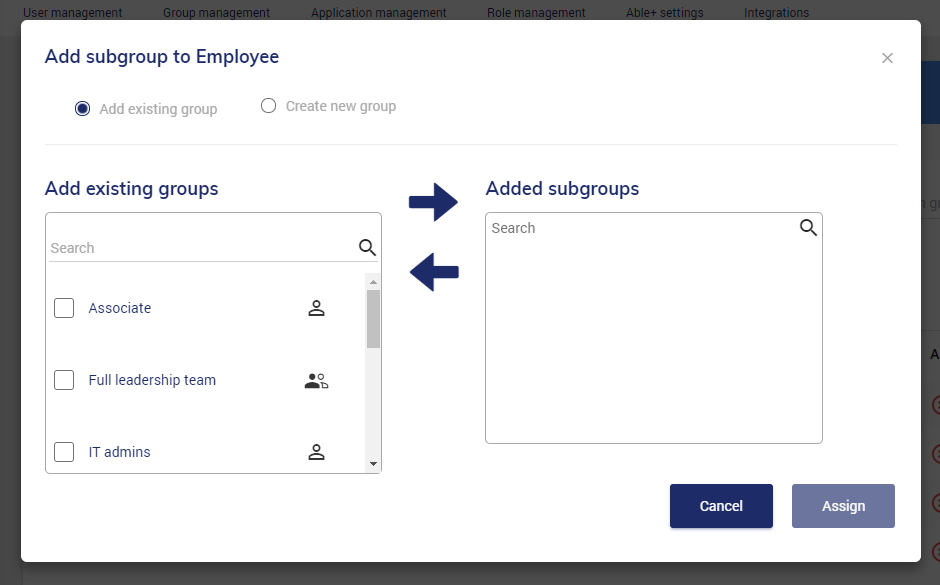
Then click the Assign button to confirm that these groups should be added as sub groups.
Alternatively, select the Create new group option at the top of the page and then create the sub group in the same way you would create a group.
| Glossary | |
|---|---|
| Assigned application | An application that appears by default on a user’s My apps page and cannot be removed from the page by the user. |
| Available application | An application that a user can choose to add to their My apps page and can be removed from the page by the user. |
| Child group | A group that is a sub group of another group. |
| Parent group | A group with one or more sub groups. |
| Standalone group | A group that is not a child or parent group. |
