Reporting
The reporting area enables you to create, view and share reports of user activity within Able+.
Accessing reporting
To access the Reporting area, click the Admin option in the left-hand menu and then select Reporting in the main admin menu along the top of the page.
From here you can select the following from the tabs along the top:
Reports – this allows you to create, view, edit and export reports
Distribution List – this allows you to create, view and edit distribution lists for your reports.
Audit – this shows you an audit of actions on Able+. It is possible to filter it by start date, end date and to search by object name.
Restore – this allows you to restore certain data that you have delete from Able+
Archived – this allows you to view and restore any reports you have archived

Please note, one or more of the actions in the Reporting category is required in a user’s permission set for them to access these features.
Creating a report
From the Reports tab, you can create a report by clicking on the plus icon in the top right-hand corner.
This will take you to the create report page.
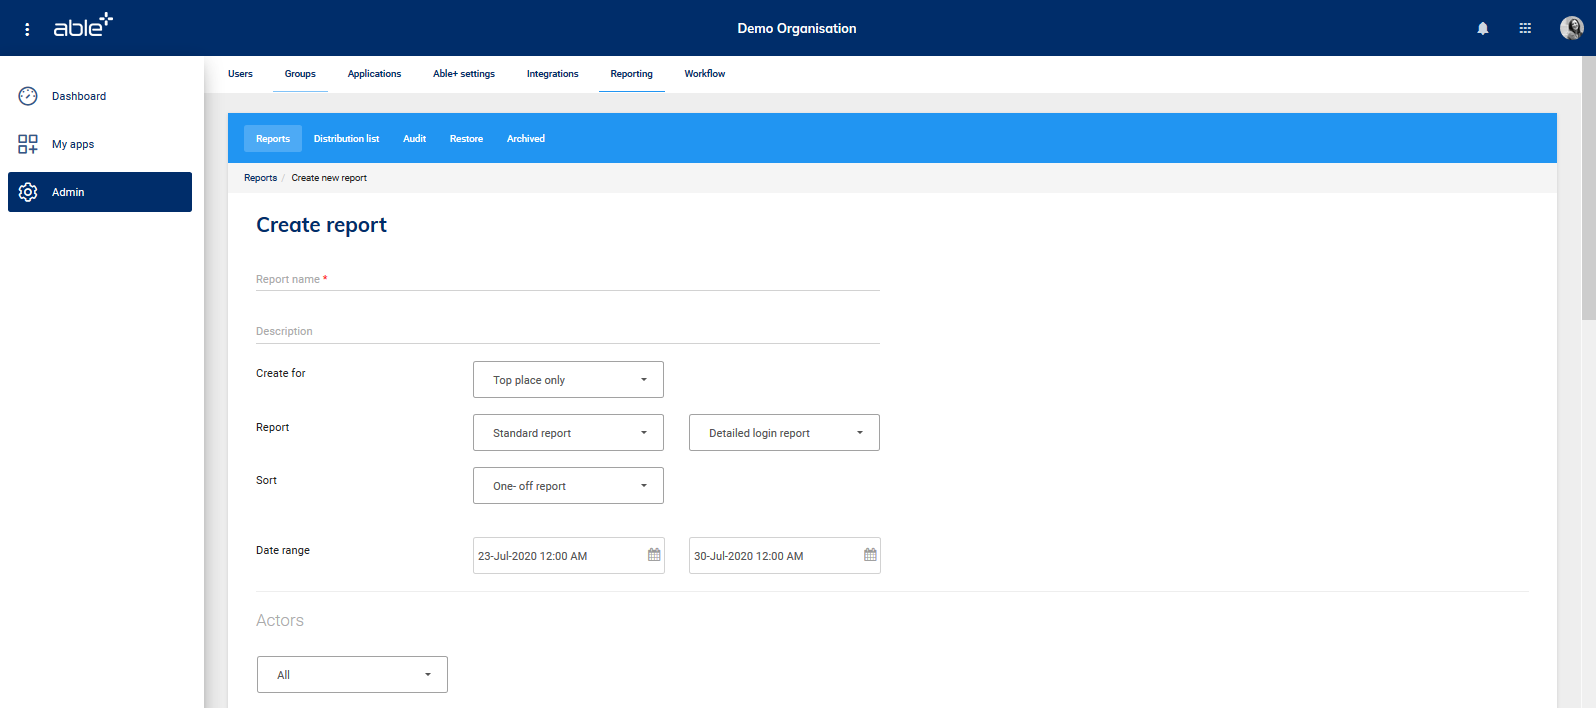
You will then see the options to do the following:
- Give the report a name. This field is mandatory and it won’t be possible to give the report the same name as an existing report in your Able+ place
- Give the report a description. This field is optional.
- Choose if you want the report to be created for the Top place only, or to also include child places. If you choose to include child places, this will make some additional changes to your report, please see below.
- Choose if you want a standard report or user defined report:
Standard report – you will then be able to select from one of the standard Able+ reports. Full details on what the standard reports include can be found here by clicking the link in the left-hand menu.
User defined report – actor, action and target will be selected by default but you can untick these if required. Further details on this are below.
- Choose if you want to create a one-off report, or scheduled report.
- Choose the date range for your report. This allows you to set the date and time for the earliest activity to be reported on and the end date and time for the latest activity to be reported on. By default the end date is the current day at 00:00 and the start date is 7 days earlier.
If you selected scheduled report, you will then get the following options:
- Choose the recurrence for your report – annual, monthly, weekly or daily
- Depending on the recurrence chosen, you can then define your criteria e.g.
- For annual recurrence, what date and time the report should run
- For monthly recurrence, how often the recurrence should happen and on what day of the month and at what time.
- For weekly recurrence, how often the recurrence should happen and on what day of the week and at what time.
- For daily recurrence, what time each day the report should run
- Choose what period the report should cover, e.g. previous n number of years/months/weeks/days.
Actors
Standard report
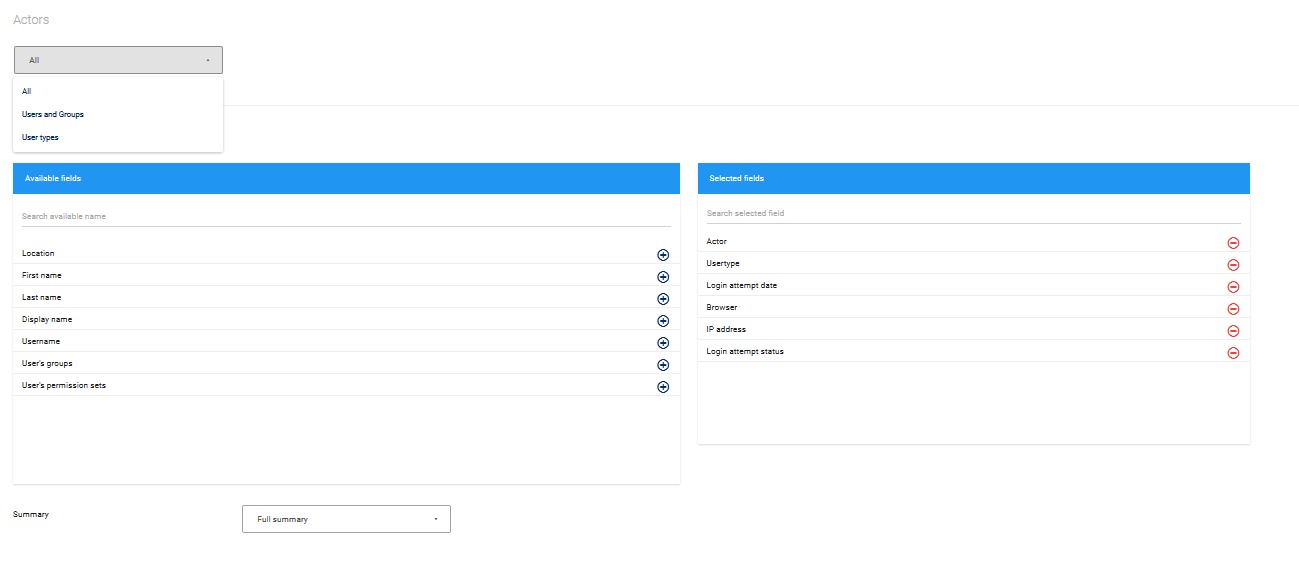
If you selected to create a standard report, you can then select from the dropdown to use All actors, or only Users and Groups or User Types.
If ‘all’ is selected no other options will display.
If ‘user types’ is selected you be presented with a list of available user types and can select/deselect one or more of these.
If ‘users and groups’ is selected you will then be able to search for and add one or more users and/or groups. Users whose full name contains the search string and groups with a name that contains the search string will be returned. It is also possible to remove selected users and groups.
User-defined report
If you selected to create a user defined report, you can decide for each of the following whether the report should include:
- Actor (who or what performed the action)
- Action (the thing that happened)
- Target (who or what the action was performed on)
By default these will all be selected. When you deselect an option it will not appear to choose options for.
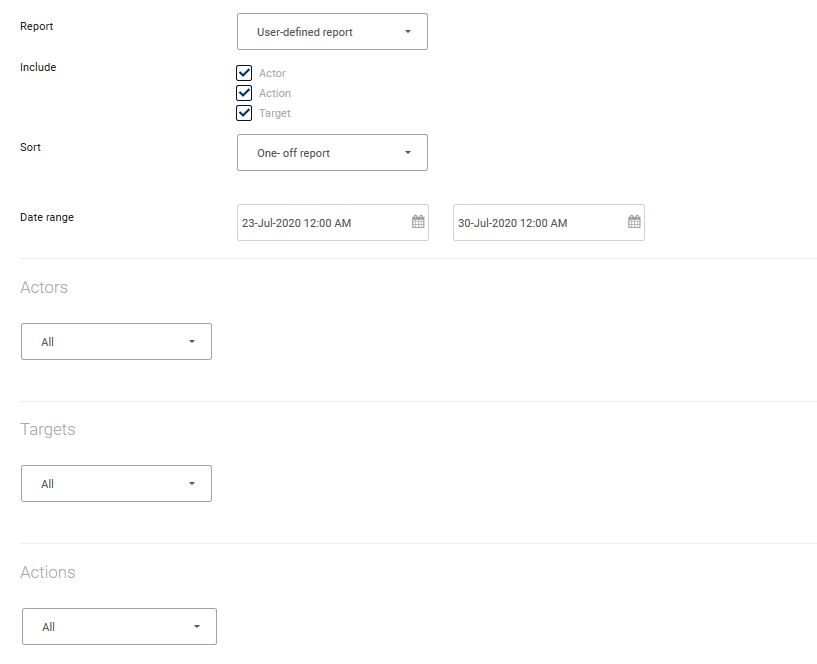
Selecting actor or target
Here you can either choose ‘all’, ‘user types’ or ‘users and groups’. The default is ‘all’.
If ‘all’ is selected no other options will display.
If ‘user types’ is selected you be presented with a list of available user types and can select/deselect one or more of these.
If ‘users and groups’ is selected you will then be able to search for and add one or more users and/or groups. Users whose full name contains the search string and groups with a name that contains the search string will be returned. It is also possible to remove selected users and groups.
Selecting action
Here you will see a list of actions organised under headings. You can select ‘all’ actions or choose selected actions. The default is ‘all’.
If ‘all’ is selected no other options will display.
If you choose selected actions you can select one or more actions. It is possible to select or deselect all actions in a particular category.
Report Details
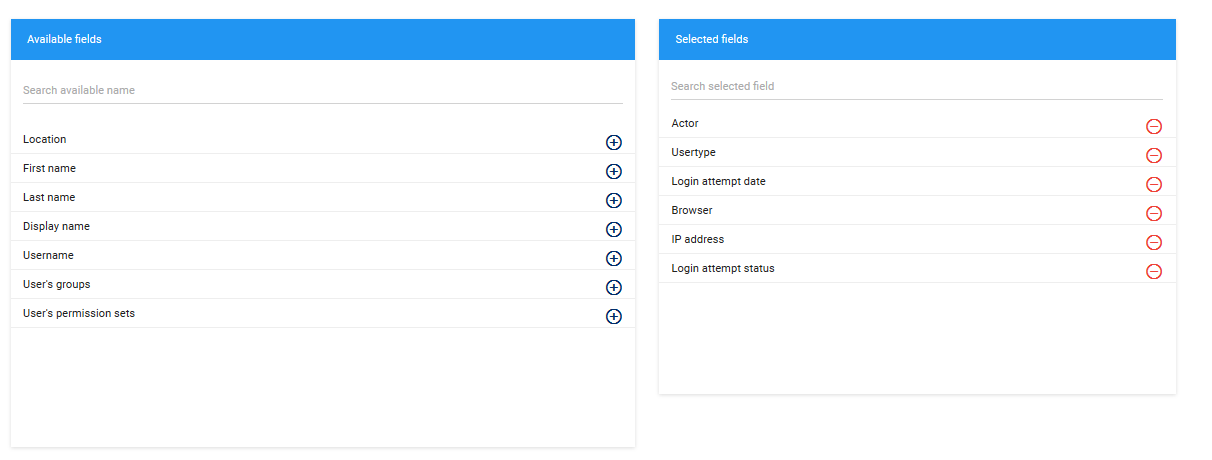
Available and Selected fields:
You will see a list of all available fields and selected fields.
Clicking on the plus icon next to an available field will move it to the selected fields box.
Clicking on the minus icon next to a selected field will remove it as a selected field.
You can search for available and selected fields.
Summary
From the dropdown box you can select from the following:
- Basic summary
- Full summary
- Successful attempts
- No Summary
Further details on what each of the summaries will include can be found in the standard reports section (please click the link in the left-hand menu to view this).
Distribute
Under distribute, you can select the following:
- Distribute report via email – if this is selected the user(s) will receive the report via email as well as internal notification. If this is not selected, the user(s) will receive the report via internal notification only.
- Recipients – here you can select recipients from an existing distribution list, or you can create a new distribution list by giving it a name and then selecting the recipients by searching for Able+ users or Able+ groups or manually adding an email address. Any recipients you add will be listed and you can click on the cross to remove them.
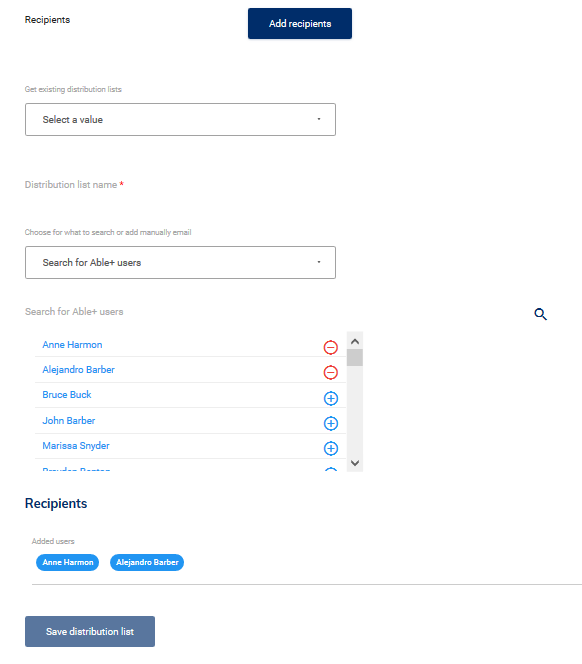
Once you have finished, click Save. You report will then appear in the list of reports.
Including child places
If you choose to include child places in your report, this will make the following changes:
- the following additional fields will be able to be added to the report:
- Able+ place of actor (added by default to all standard reports)
- Able+ place of target (added by default to administrative action report)
- Able+ place where action performed (added by default to administrative action report)
- when selecting actors and targets it will be possible to search for and add users or groups from all places within the organisation – the place will be displayed in brackets after the user or group that is returned in the search results. Results from the top level organisation appear first.
Viewing reports
From the Reports tab, you can view a list of existing reports, in alphabetical order of report name.
You can view:
- The report name
- The report description
- The name of the user who created the report
- The date and time it was created

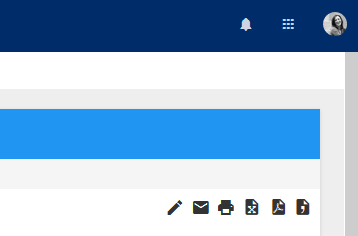
The actions column shows the actions you are able to perform on the report as follows (please note, this is dependent on the permissions you have):
- Edit the report
- Archive the report
- Email the report
- Print the report
- Export the report to Excel
- Export the report to PDF
- Export the report to Word
You can search for a report using the search field at the top.
You can sort reports by name or created date.
To view the report, click on the report name.
The report is set out in 2 main sections:
Report Summary – this provides a summary of the date in the report. Please note, this will only appear if the report is a standard report and the option to display the summary table was chosen when creating the report.
Report Data – this provides the full report data. It is possible to filter the report by date range. By default, the data range filters will automatically show the start and end date and time defined in the report.
It is possible to search the report data. You can select if you wish to search in all text fields or to choose only one text field to search within (using the ‘search in’ dropbox). If ‘all fields’ in selected, then the search will return any records where the search string is included in any of the fields.
By default, the report is sorted by the first column but you can sort by all columns in both directions.
From this page, you can perform actions on the report as detailed above, by clicking on the icons in the top right-hand corner.
Editing a report
Clicking on the Edit report icon allows you to edit the report. Once you have made your changes to your report you have the following options:
Discard – to discard the changes you have made
Save as new – to save your report as a new report with a new name
Save – to save your changes
Printing a report
Clicking on the Print icon will open the browser print dialog and print the report.
The printed version of the report will include the summary table where this is enabled for the report.
When accessed from the list of available reports, the printed version will include the total number of records and will display in the same order as the report default.
When accessed from viewing an individual report, the printed version will show the same information in the same order as you are currently viewing the report; clicking to print when viewing a filtered version of the report will print the filtered records rather than all records. The total number of records will reflect the total number of records in the filtered view where appropriate.
The column headings will display on each page of the printout.
The printout footer will include the name of the report, the current date (in the format DD-MM-YYYY) and page number.
Exporting a report
It is possible to export reports in 3 formats: Excel, Word or PDF.
The filename will be the name of the report followed by the date and time (in the format DDMMYYYY HHMM) the export was created (e.g. New users 13032019 1332).
Excel export: When the report is exported to Excel if a summary table is available this will display first. There will then be a blank row.
The data will then display in the same order as the report default. The column headings will display in the same order as in the report.
PDF and Word export: When accessed from the list of available reports, the exported PDF and Word versions will include the total number of records and will display in the same order as the report default.
When accessed from viewing an individual report, the PDF and Word versions will show the same information in the same order as you are currently viewing the report; clicking to export when viewing a filtered version of the report will export the filtered records rather than all records. The total number of records will reflect the total number of records in the filtered view where appropriate.
The column headings will display on each page of the export.
The export footer will include the name of the report, the current date and page number.
Emailing a report
When selecting to email a report, you are given 2 options:
- Get existing distribution lists – the recipients of the report will then be populated automatically from the selected list.
- Select recipients – this allows you to search for and add users or groups or manually add an email address.
All added recipients can be removed individually if required.
It is possible to save the recipients as a new Distribution list for future use
Once you have chosen your report recipients, click continue and then you can choose which format the report should be sent as: Excel, Word, or PDF.
The default subject of the email is the name of the report and the current date, but you can edit this.
The default content of the email will be:
Attached report sent by [Logged in user’s Display Name] from [Logged in user’s Able+ place display name].
This can be edited (plain text only).
Once you have finalised your email, click send to send the email or cancel to not send the email.
If you click send, the email will be sent to any manually added recipient email addresses and the communication email addresses of all recipient users or members of groups.
Where one or more of the recipient users or members of groups does not have a communication email address you will see a message that says:
The following users do not have an email address stored in Able+. Do you want to send these users an internal link to the report?
This will be followed by a list of the users’ display names – one per line.
Clicking Send will send a notification to the user(s).
Clicking Cancel will close the message.
Archiving a report
From the Reports page, you can archive a report individually, or archive multiple reports using the multi select.
Once a report has been archived, it won’t appear in the main list. Instead, it will appear on the Archived list, which can be accessed by clicking on the Archived tab.
An archived report will no longer be run according to its schedule and no further reports will be distributed. You cannot edit an archived report. You can still print or export an archived report. This will use the last run version of the report.
The archived report and all its information can still be viewed by any user who had permission to view it when it was not archived
It is possible to restore an archived report to the main report list in which case it will continue to run to its schedule and these reports will be distributed as originally defined. Reports can be restored individually or in bulk.
Distribution lists
From the distribution lists tab, you can view a list of existing distribution lists and create new ones.

You can view:
- The distribution list name
- The name of the user who created the distribution list
- The number of recipients in the distribution list
- The date and time it was created
You can delete a distribution list by clicking on the bin icon on the actions column.
You can view and edit a distribution list by clicking on the name of the list. From here you can change the name of the list and edit the recipients.
You can create a new distribution list by clicking on the plus icon in the top right-hand corner.
When creating a distribution list, you can choose to create it from an existing list or create a brand new one.
You can then give the distribution list a name and select the recipients, by searching for Able+ users or Able+ groups or manually adding an email address. Any recipients you add will be listed and you can click on the cross to remove them.
Standard reports
- Detailed login report
- Unique Login
- User Action
- Application Access
- Administrative Action
- Unusual activity report
The following provides an outline of the data that can be generated in each standard Able+ report:
Detailed log in report
The detailed log in report will show the details of each time a user has attempted to log in to Able+ over the selected period.
Default fields
The following fields will be selected by default for the detailed log in report:
- Actor
- User Type
- Login attempt date & time (DD/MM/YYYY HH:MM)
- User’s browser
- User’s IP address
- Login attempt status (success or fail)
Report summary
It will be possible to select to display either a full summary, a successful attempts summary, a basic summary or no summary.
The full summary will show a table of the following:
- Total number of successful logins
- Total number of unsuccessful logins
- Total number of successful logins per user type
- Total number of unsuccessful logins per user type
- Total number of successful logins for each hour of the day (if time period is less than 24 hours)
- Average number of successful logins per hour of the day (if time period is more than 24 hours)
- Total number of successful logins for each day of the week (if time period is more than 24 hours and not more than 7 days)
- Average number of successful logins per day of the week (if time period is more than 7 days)
- Total number of successful logins for each month (if time period is more than one month and not more than 1 year)
- Average number of successful logins per month (if time period is more than one year)
- Total number of successful logins for each year (if time period is more than one year)
The successful attempts summary will show a table of the following:
- Total number of successful logins
- Total number of successful logins per user type
- Total number of successful logins for each hour of the day (if time period is less than 24 hours)
- Average number of successful logins per hour of the day (if time period is more than 24 hours)
- Total number of successful logins for each day of the week (if time period is more than 24 hours and not more than 7 days)
- Average number of successful logins per day of the week (if time period is more than 7 days)
- Total number of successful logins for each month (if time period is more than one month and not more than 1 year)
- Average number of successful logins per month (if time period is more than one year)
- Total number of successful logins for each year (if time period is more than one year)
The basic summary will show a table of the following:
- Total number of successful logins
- Total number of unsuccessful logins
- Total number of successful logins per user type
- Total number of unsuccessful logins per user type
- Average number of successful logins per hour of the day (if time period is more than 24 hours)
- Average number of successful logins per day of the week (if time period is more than 7 days)
Unique login report
The unique log in report will aggregate the number of times a user has logged in to Able+ over the selected period.
Default fields
The following fields will be selected by default for the unique log in report:
- Actor
- User Type
- Number of logins (by the user during period)
- Date and time of most recent successful log in attempt (DD/MM/YYYY HH:MM)
- Date and time of most recent log in attempt (DD/MM/YYYY HH:MM)
- IP address (of most recent log in attempt)
- Browser (of most recent log in attempt)
- Login attempt status of most recent attempt (success or fail)
Report summary
It will be possible to select to display a summary with the report.
The summary (if selected) will show a table detailing the following information:
- Total number of unique logins
- Total number of unique logins per user type
- Total number of users whose last login attempt failed
User action report
The user action report will show the details of every action that user has performed in Able+ during the selected period.
Default fields
The following fields will be selected by default for the user action report:
- Action performed
- Target of action (where applicable)
- Detail of action (where appropriate e.g. what entitlement was given to the target)
- Date & time action performed (DD/MM/YYYY HH:MM)
Report summary
It will be possible to select to display either a full summary, a basic summary or no summary.
The full summary will show a table of the following:
- Total number of actions performed
- Total number of each action type (only actions included will be listed)
- Total number of actions performed for each hour of the day (if time period is less than 24 hours)
- Average number of actions performed per hour of the day (if time period is more than 24 hours)
- Total number of actions performed for each day of the week (if time period is more than 24 hours and not more than 7 days)
- Average number of actions performed per day of the week (if time period is more than 7 days)
- Total number of actions performed for each month (if time period is more than one month and not more than 1 year)
- Average number of actions performed per month (if time period is more than one year)
- Total number of actions performed for each year (if time period is more than one year)
The basic summary will show a table of the following:
- Total number of actions performed
- Average number of actions performed per hour of the day (if time period is more than 24 hours)
- Average number of actions performed per day of the week (if time period is more than 7 days)
Application access report
The application access report will show information about which users have accessed which applications within the selected place.
Default fields
The following fields will be selected by default for the application access report:
- Actor
- User Type
- Name of application accessed
- Date and time application was accessed (DD/MM/YYYY HH:MM)
Report summary
It will be possible to select to display either a full summary, a basic summary or no summary.
The full summary will show a table of the following:
- Number of times each application was accessed
- Number of unique users accessing each application
- Average number of times each application was accessed per hour of the day (if time period is more than 24 hours)
- Average number of times each application was accessed per day of the week (if time period is more than 7 days)
- Average number of unique users accessing each application per hour of the day (if time period is more than 24 hours)
- Average number of unique users accessing each application per day of the week (if time period is more than 7 days)
The basic summary will show a table of the following:
- Number of times each application was accessed
- Number of unique users accessing each application
Administrative action report
The administrative action report will show details of administrative actions performed by users within a place.
Select administrative area
There will be a list of the administration sections. By default these will all be selected but they can be deselected/ reselected.
The current sections are:
- User management
- Group management
- Resource management
- Place management
- Workflow management
- Report management
Default fields
The following fields will be selected by default for the application access report:
- Actor
- User Type
- Action
- Target
- Date and time action was performed (DD/MM/YYYY HH:MM)
Report summary
It will be possible to select to display a summary with the report.
The summary (if selected) will show a table detailing the following information:
- Number of users performing administrative actions
- Number of administrative actions performed
- Average number of actions performed per person
Unusual activity report
The unusual activity report will show information concerning log in attempts that an organisation has determined may be unusual.
There will be a list of all types of unusual activity defined by the organisation at place level. By default these will all be selected but they can be deselected/reselected.
The possible options (depending on what has been enabled are):
- Multiple incorrect password attempts
- Access from within a defined geographical area
- Access from outside of a defined geographical area
- Access from a specific IP address/range
- Access outside a specific IP address/range
Default fields
The following fields will be selected by default for the unusual activity report:
- Actor (see Data for reporting for format)
- Username
- User Type
- Type of unusual activity (see list above)
- Date and time of unusual activity (DD/MM/YYYY HH:MM)
- User’s IP address
- User’s location
- Number of incorrect password attempts
Report summary
It will be possible to select to display either a full summary, a basic summary or no summary.
The full summary will show a table of the following:
- Number of times unusual activity was recorded
- Number of times unusual activity was recorded per type of activity
- Number of unique users exhibiting unusual activity
- Number of unique users exhibiting unusual activity per type of activity
- Total number of times unusual activity was recorded for each hour of the day (if time period is less than 24 hours)
- Average number of times unusual activity was recorded per hour of the day (if time period is more than 24 hours)
- Total number of times unusual activity was recorded for each day of the week (if time period is more than 24 hours and not more than 7 days)
- Average number of times unusual activity was recorded per day of the week (if time period is more than 7 days)
- Total number of times unusual activity was recorded for each month (if time period is more than one month and not more than 1 year)
- Average number of times unusual activity was recorded per month (if time period is more than one year)
- Total number of times unusual activity was recorded for each year (if time period is more than one year)
The basic summary will show a table of the following:
- Number of times unusual activity was recorded
- Number of times unusual activity was recorded per type of activity
- Number of unique users exhibiting unusual activity
- Number of unique users exhibiting unusual activity per type of activity
