User management in Able+
The User management area enables you to view and manage users that are synchronized into or created in Able+.
Accessing user management
To access the user management area, click the Admin option in the left-hand menu and then select Users in the main admin menu along the top of the page.

Please note, one or more of the actions in the user management category is required in a user’s permission set for them to access this feature. The specific actions in the user’s permission set will control whether or not they can perform the user management actions within this document. Please refer to the Able+ actions directory for further information.
User information
Viewing user information
A user’s basic information is displayed in the list of users on the Users overview page when you first access user management.
For each user you can see the following information:
-
Username
-
First and last name
-
User type
-
Status
-
Permission(s) assigned to the user
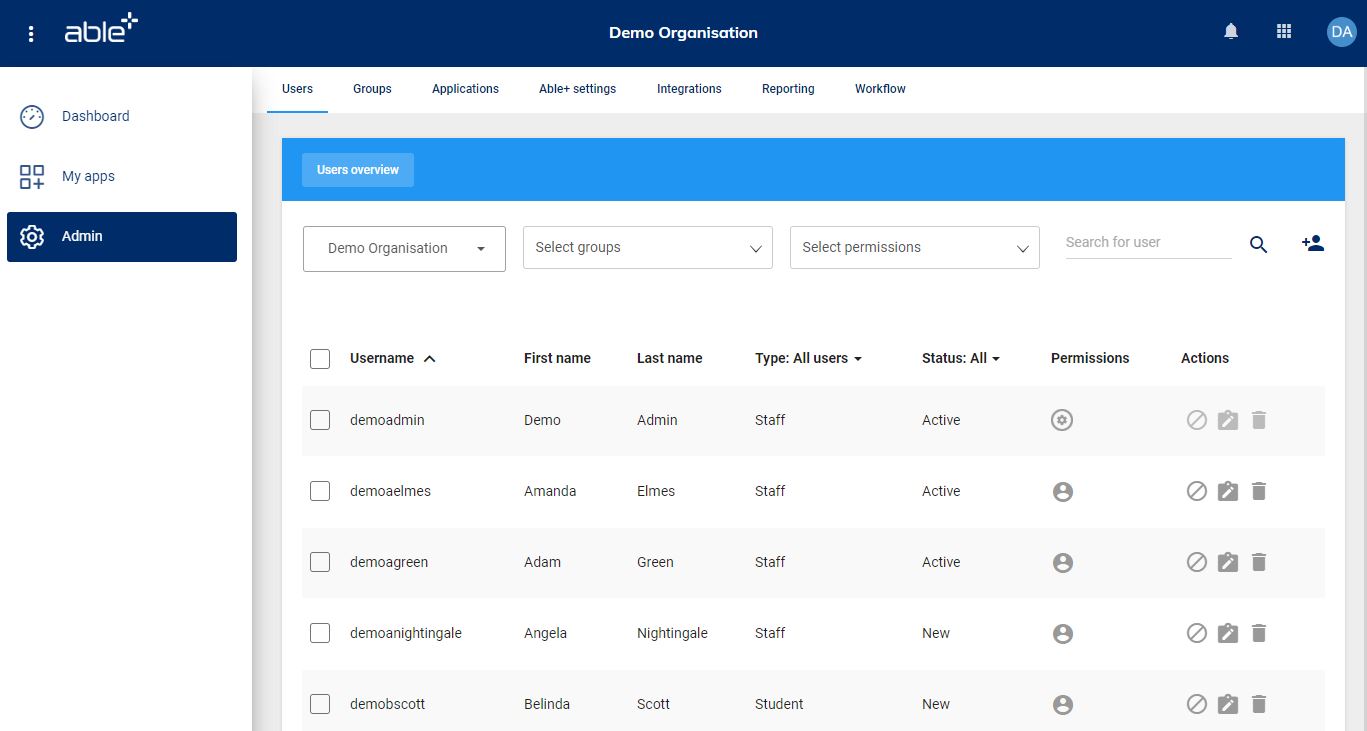
By default the users are sorted by username, but you can change this to first name or last name by clicking on the relevant column heading.
You can also choose to show just users of a particular type or status by clicking on the filter option next to that column heading.
It is also possible to show users from a particular group or with a certain permission set by using the Select groups and Select permissions options at the top of the page.
You can search for a particular user in the search option at the top of the page. By default it will search by last name but you can change this using the dropdown option to the right of the search box.
Viewing an individual user’s details
To view a user’s details, click on their name in the Users overview list.
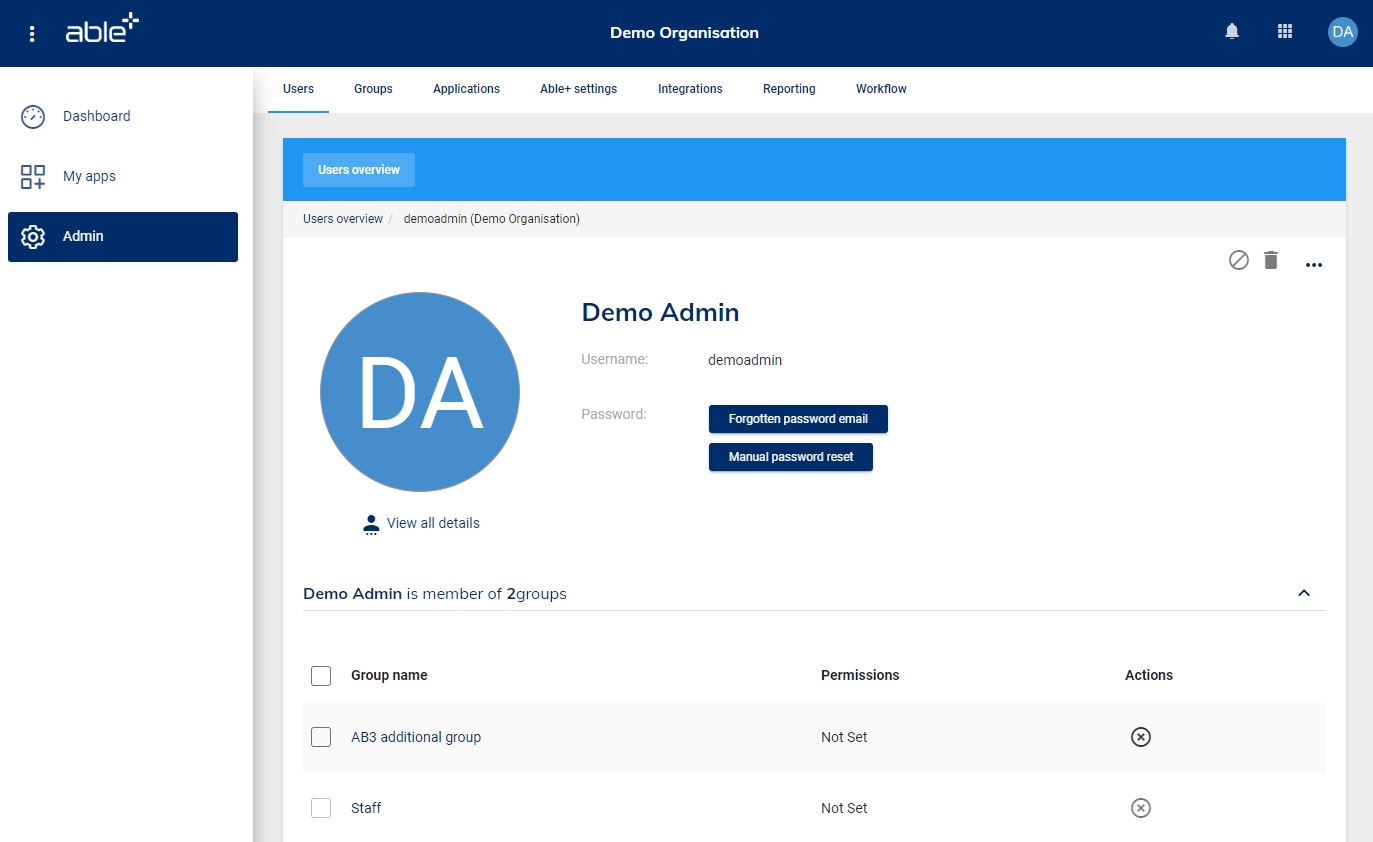
You will see their avatar, first and last names and username together with a list of any groups they belong to.
Click on the View all details option to view all details held in Able+ for the user.
Editing a user's details
To edit any of the user’s details, click on the View all details option under the user’s avatar and then click the pencil icon in the top right corner.
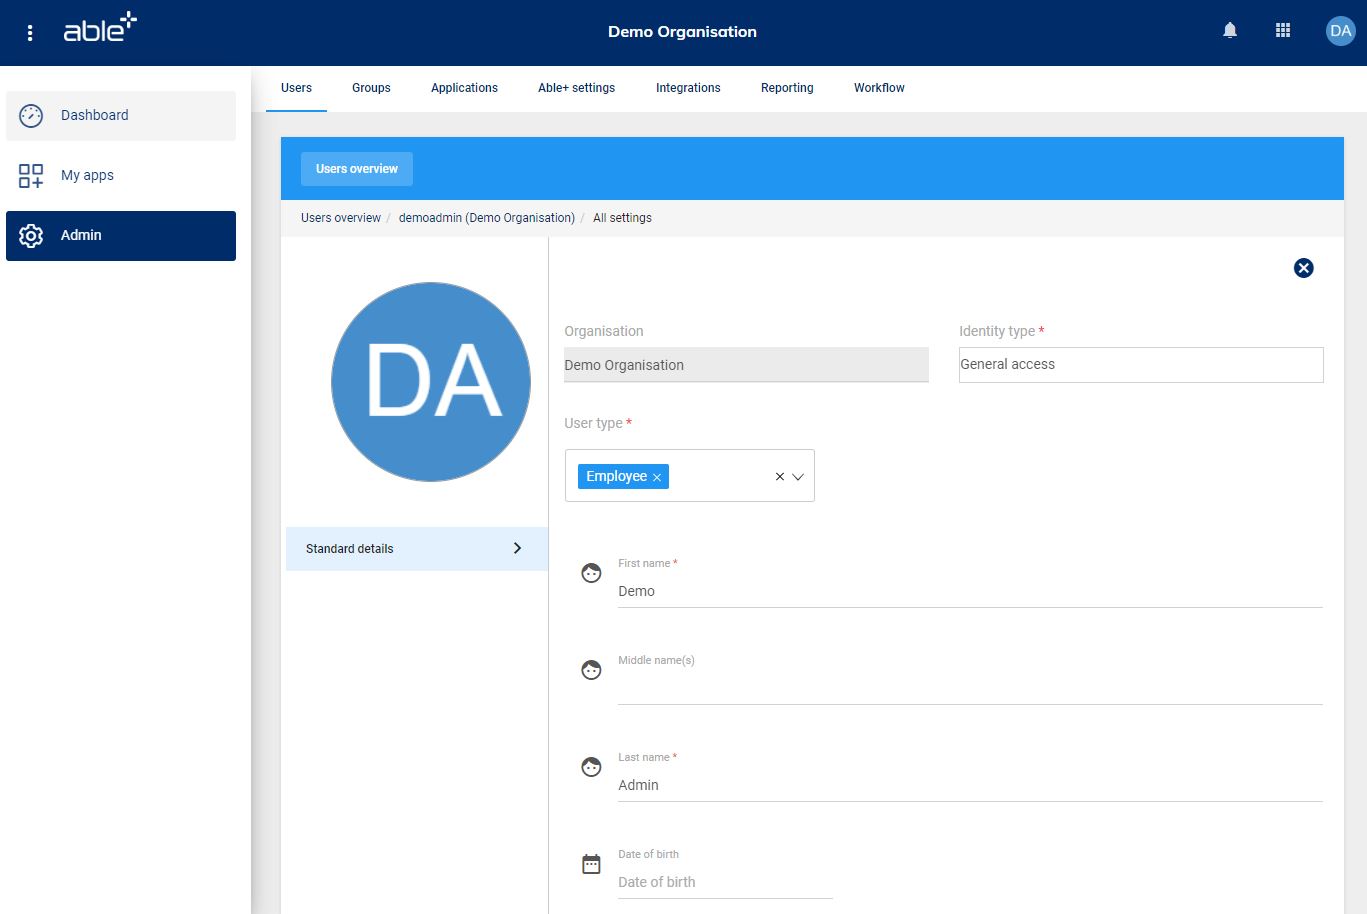
This will then put all relevant fields into edit mode.
When you have finished editing, click the Save button at the bottom of the page. If you want to discard the changes then click Cancel.
Viewing and Editing Organisation Specific Details
If you have any organisation specific details for your organisation, they can be viewed by going into your Able+ Personal settings and then by clicking Organisation specific details.
Whether a user is able to view and edit their own system-optional data will depend on whether they have these actions enabled within the core actions category.
There are also additional actions in the user management category which will control whether a user can view and edit all users’ system-optional data.
Creating users
Although users are generally created either via an external source or by uploading a CSV file, it is possible to create individual users in Able+ through the user management page. For further information on creating users in bulk see the Integrations in Able+ user guide.
Manually creating a user
On the Users overview page, click the Create new user icon in the top right corner.
Fill in the user’s details in the fields that appear. All mandatory fields are indicated with an asterisk.
Choose an identity type that reflects the user’s security and access needs.
Choose a user type relevant to how the user relates to your organisation (e.g. learner, employee).
Give the user one or more permission sets to control what actions they will be able to perform when logged in to Able+.
The user’s display name will be used to identify them in Able+ (e.g. when the user logs in or when an administrator is choosing users to add to a group).
The user’s identity type will determine how strong a password you must enter when creating the user. Passwords must be a minimum of 6 characters, regardless of identity type.
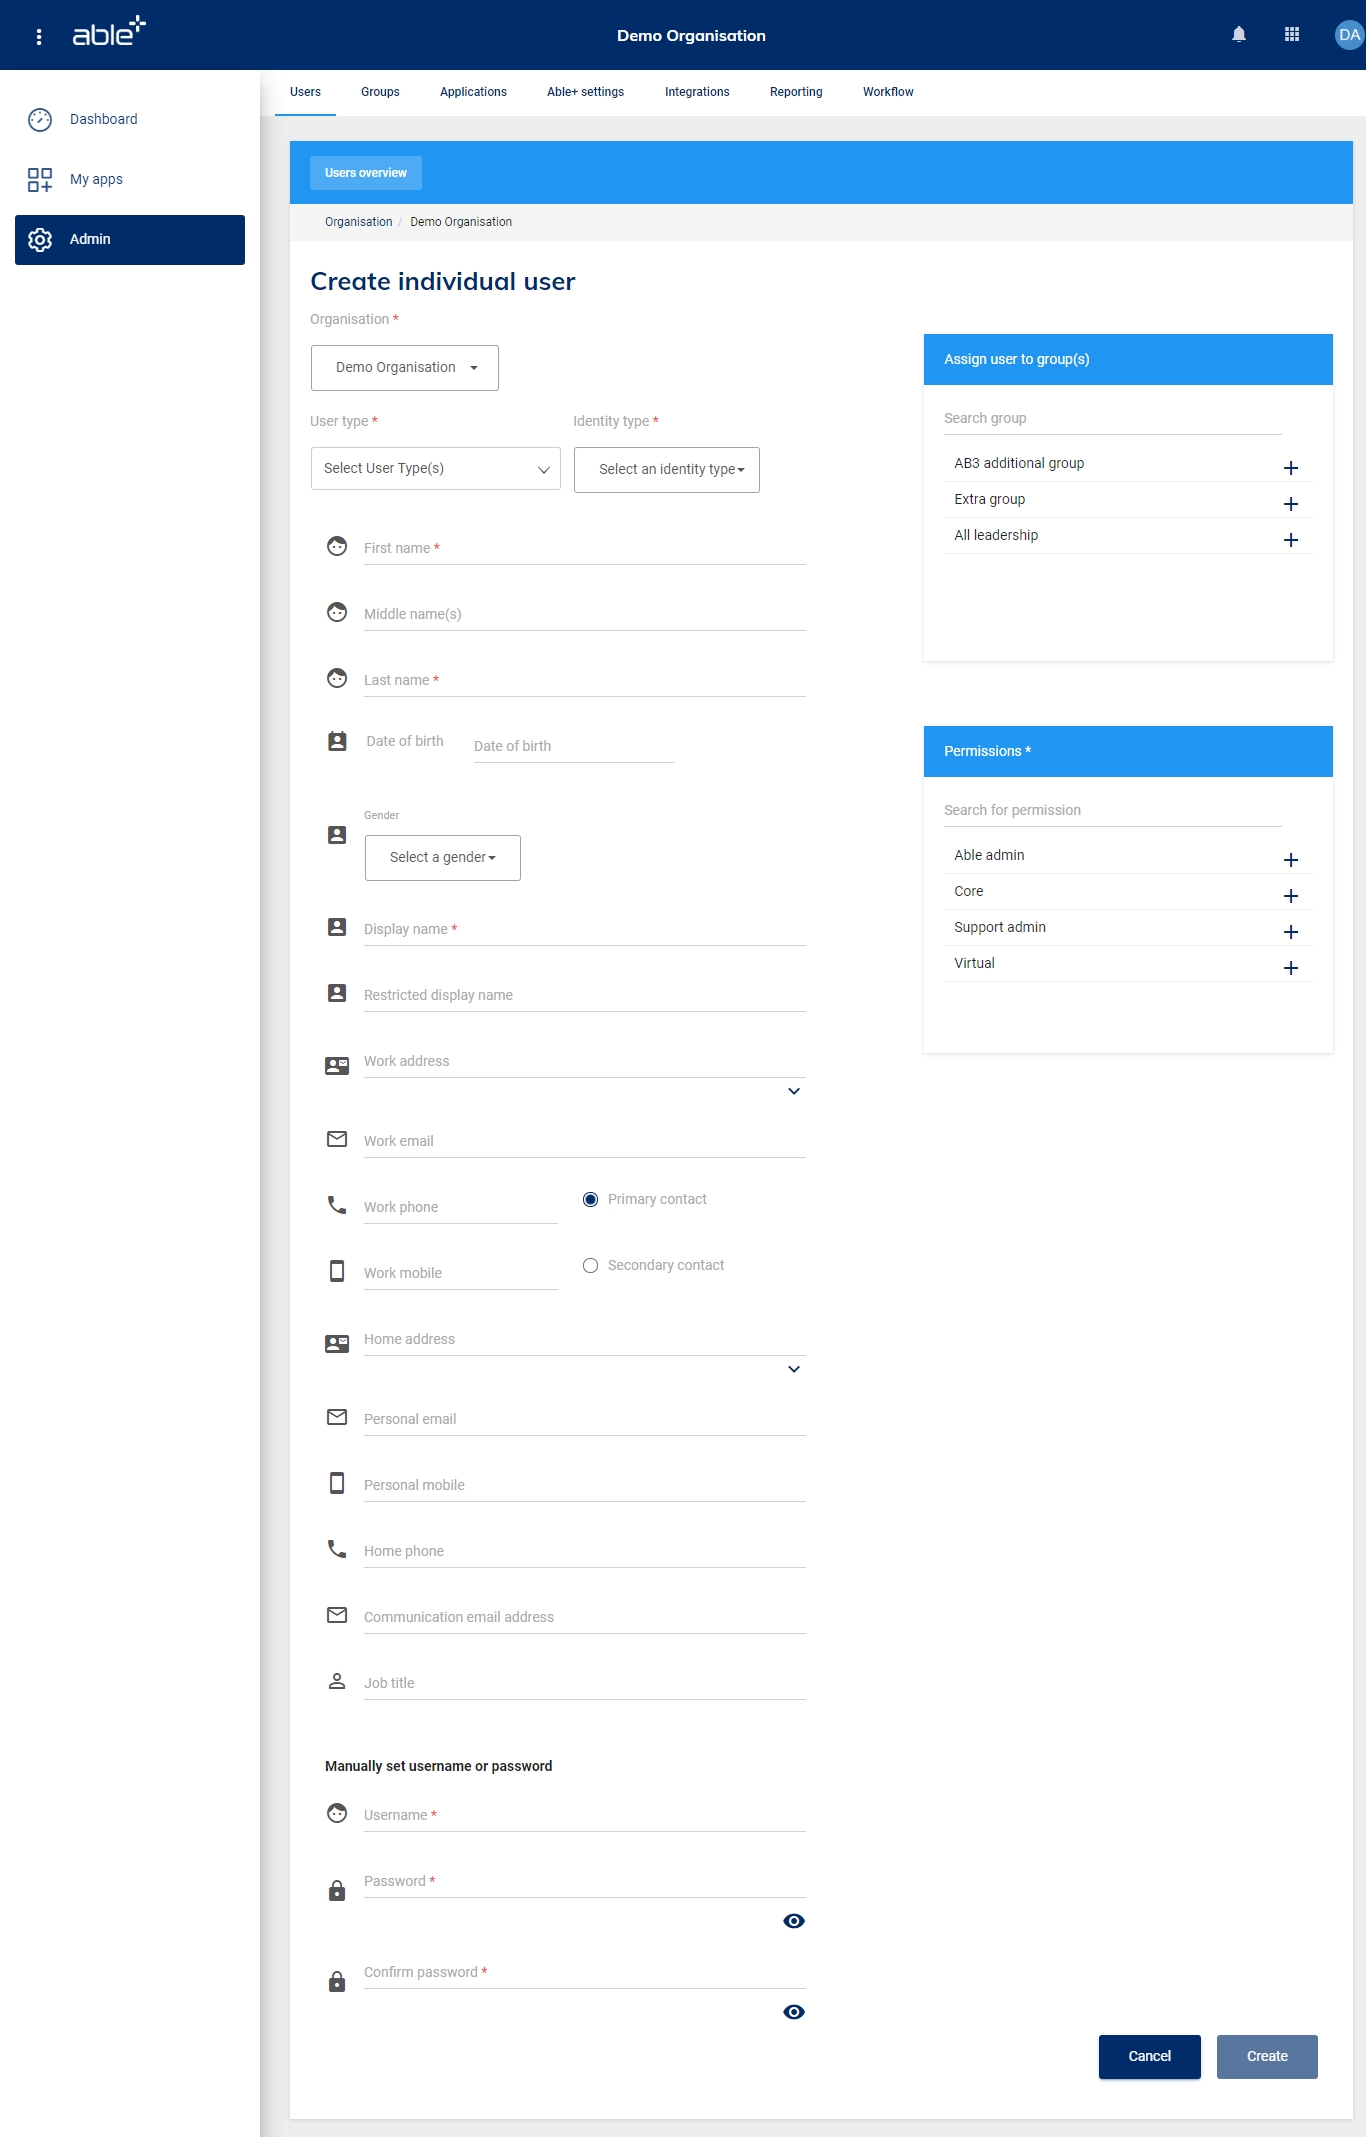
When all mandatory fields are complete then the Create button at the bottom of the page will become active. Click it to create the user.
The user will then appear on the Users overview list.
Resetting a user's password
When a user has forgotten their password you can send an email to them with details to allow them to reset it.
On the Users overview page, click on the relevant user to view their information then click the Reset password button.
If the user has specified a recovery email address then this will be displayed as the address that the reset email should be sent to. You can edit this address if required.
When the email address is correct, click Send. You will be required to enter your own password as an additional security measure.
The user will then be sent an email with instructions to reset their password.
Bulk send forgotten password email
You can send emails in bulk to users who have forgotten their passwords.
- Log in as an admin user and click on the Admin tab from the left-side menu
- From the Users overview list select the required users and then click the more options dots in the top-right region
- Choose 'Forgotten password email' from the drop-down menu
- A confirmation message will appear - if any users do not have a verified email address, then these will be listed in the confirmation dialogue
- Click OK to send a password reset to users' recovery email addresses
Bulk send account login details
You can send account login details to users who have a recovery email address in bulk.
- Log in as an admin user and click on the Admin tab from the left-side menu
- From the Users overview list select the required users and then click the more options dots in the top-right region
- Choose 'Send account details' from the drop-down menu
- A confirmation message will appear - if any users do not have a verified email address, then these will be listed in the confirmation dialogue
- Click OK to send a password reset to users' recovery email addresses
- Included in the email are the user's username and a link to set a new password (48 hour expiry)
The user's password will not be displayed in the email.
Suspending and activating users
It is possible to suspend a user to prevent them temporarily having access to Able+.
Suspending a user
On the Users overview page, find the user you want to suspend and then click the suspend icon in the action column.
Enter the reason for suspending the user and then click Suspend.
The user’s status will change from Active to Suspended.
Reactivating a suspended user
When you want to give a suspended user access to Able+ again, find the user you want to activate and then click the activate icon in the action column. You will be shown the reason that they were suspended originally.
Enter the reason for reactivating the user and then click Activate.
The user’s status will change from Suspended to Active.
Deleting a user
It is possible to delete any user that is controlled within Able+ (i.e. where the user is not created via synchronisation with an external input).
One or more users can be deleted from the Users overview page by selecting them and then using the delete option in the top right corner of the page.
When you are viewing the details of a particular user you can delete that user using the delete option in the top right corner of the page.
Changing permission sets and identity types
Changing permission sets
It is possible to change the permission set assigned to a user either individually - by clicking the edit permission option next to the relevant user - or in bulk - by selecting users and then choosing Add/remove permissions from ‘more options’
.
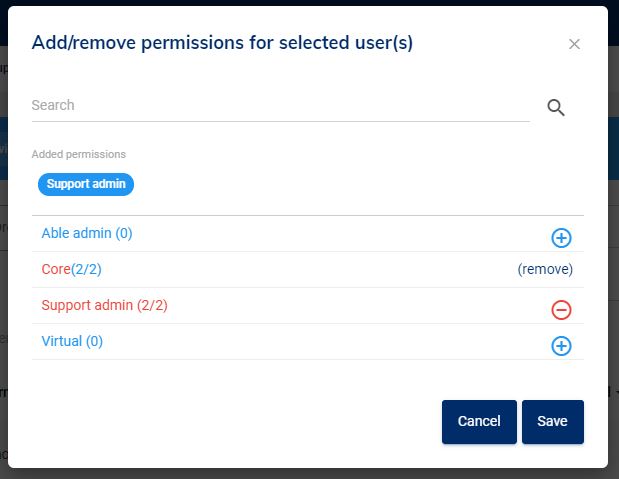
The permission sets available will be those that your organisation has on the Able+ settings page.
Click the next to a permission set to add that permission set for all the selected user(s).
When viewing a single user, click the minus next to the relevant permission set to remove it from the user. When viewing multiple users, click the Remove option.
It is possible for a user to have more than one permission set; in this case they will have all the actions for all the permission sets they have been assigned.
Changing identity type
An individual user’s identity type can be changed when viewing that user’s individual details (see Editing a user’s details section above).
Identity types can be changed in bulk by selecting the relevant users and choosing the Change identity type option from ‘more options’ . Select the required identity type from the dropdown list and then click Save.
Exporting user details
When one or more users are selected on the Users overview page, click on ‘more options’ in the top right-hand corner and select the Export user details option.
This will download the selected users’ details as a CSV file that can be opened and manipulated in a spreadsheet program.
Controlling application access via user management
From the Users page you can assign applications to users. These will appear on the My apps page of all members in that group and they will not be able to remove them.
If you just want to make an application available to the users so that they can choose to add it if they wish then this can be done from the application management area.
Managing applications in individual user view
When you are viewing a user, you can select the Manage applications option from ‘more options’ .
Any apps that the user already has enabled for them will appear in the list of available applications. These can be removed by clicking the minus next to the relevant application.
Additional applications can be added for the user by clicking on the plus next to Manage applications and then clicking on the application you wish to add.
Click Save when you have finished making changes.
Managing applications for multiple users
From the Users overview page, select the users you wish to manage application access for and then click ‘more options’ and then chose Add/remove applications.
In the Added applications section you will see a lozenge for each added application - clicking on this will give you an option to remove it for all selected users.
Next to each application you will see how many of the selected users currently have that application assigned to them. Click the to add the application for all the selected users.
Adding apps for multiple users
When adding applications for multiple users, these will have the status Enabled and will appear automatically on the users’ My apps page. If instead you wish to make the application available to users so they can choose to add it if they wish then this can be done on the relevant application page. See Application management in Able+ for further information.
| Glossary | |
|---|---|
| Enabled application | An application that appears by default on a user’s My apps page and cannot be removed from the page by the user. |
| Available application | An application that a user can choose to add to their My apps page and can be removed from the page by the user. |
| Identity type | A user’s identity type controls their security and access settings. |
| Permission set | A user’s permission set specifies the actions that they are able to perform when logged in to Able+. |
| User type | The user type shows how a user relates to your organisation (e.g. student, staff). |
